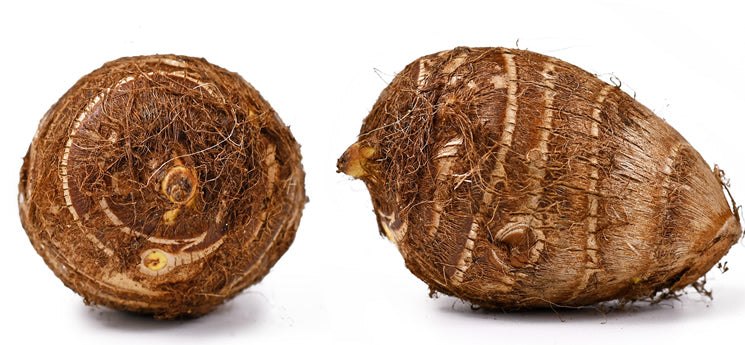
Elephant ears are one of the most distinctive plants that thrive both indoors as well as outdoors, and they have been gaining major popularity over the past few years. This popularity is mainly due to its giant heart shaped foliage which creates a striking center piece in any home or garden. Elephant ears are known as an indoor plant during the colder months and then are transferred outside during the warmer months. In this article we will guide you through all the necessary steps to growing and maintaining Elephant Ears whether that be in your home or garden.

How to Plant Elephant Ear Tubers
As Elephant ears are from tropical and subtropical regions of Asia and eastern Australia, they need warm soil and humidity to prosper. They also need sun exposure but benefit from a little midday shade, so planning is key to maintaining these plants.
Once you have decided on a suitable location for your elephant ears and all sign of winter frost has gone (soil needs to be above 70 degrees) you can begin planting your tubers.
- Prepare the soil by turning it 8” deep then level the soil by raking it, removing any clumps including stones and grass. Elephant ear tubers prefer loose and well-drained soil whether this be in a pot or in a bed. It is also a good idea to introduce some compost into your soil so that you are providing the tubers with nutrients.
- Next you need to dig your holes around 5” deep and 2-4 feet apart from one another.
- Plant your elephant ear tubers so that the pointed edge is facing upwards and the tuber is approximately 1” below the surface of the soil.
- Cover the tuber with soil and water thoroughly.
- When watering elephant ear plants you want to keep the soil moist but not soggy. It is also best to let the first inch of soil become dry before watering the plant again.
If you want to begin planting your tubers earlier then you can prepare them in pots inside. This should be done 6-8 weeks before any frost is due to end. Plant your elephant ear tubers in individual pots approximately 6” deep. As previously mentioned, these tubers need warm soil so consider using a heated mat under the pots.
Elephant ears are only hardy in zones 7-11 so, if you would like to use the same tubers next year you need to dig the bulbs up after the first frost. Once you have done so let the tubers dry inside out of direct sunlight but with plenty of air for the tubers to breathe. You can then shake off any remaining soil and remove any leaves. Store your elephant ear tubers in peat moss and soil in no less than 50 degrees.

How to Care for Elephant Ears
Once you have planted your elephant ear tubers and they have sprouted, you do not need to tender much to them. You simply need to keep the soil moist, like it would be in most tropical climates and occasionally deed it with a fertilizer high in nitrogen.
Common Pests and Diseases
Like any plant, elephant ears do have some common challenges. The most common of these is leaf spots which causes black or brown spots to appear on foliage. This is usually a sign of dehydration so make sure your plants are getting enough water. Secondly, these plants are known for spider mites. These spider-like pests are tiny but can cause a great amount of damage by injecting toxins into the foliage triggering white dots to appear. Spider mites also remove chlorophyll from the plant which causes foliage to turn yellow and become dry. Spider mites thrive in dry foliage so they multiple quickly once this happens. The best way to avoid mites is to spray to foliage every few weeks with warm soapy water to keep the plant dust free.

For other bulbs check their descriptions to see their unique growing guide and further instructions on how to care for them.